Express documentation
Express is a Node package which is a web development framework for creating servers using Node.
What is Express?
Express helps us;
- Start up a server to listen for requests
- Parse incoming requests
- Match those requests to particular routes
- Craft our HTTP response and associated content
Installing Express
npm i express
Don't forget to require express in the JS file.
How to start a server with Express
- Require Express
- Execute Express
- Handle incoming requests with the use method
- Listen for requests at a particular port number, below example is port 3000.
const express = require('express');
const app = express();
                        app.use((req,
                        res) =>
                        {

                        CODE TO RUN WHEN WE GET INCOMING REQUESTS GOES HERE SUCH AS;

                        res.send();

                        })
                        app.listen(3000, () =>
                        {

                        CODE TO RUN WHEN WE START LISTENING GOES HERE

                        })
Request and Response objects
For every method in Express, Express automatically creates 2 javascript objects for us to use, Request and Response
The req object is based upon the incoming HTTP request.
The res object is used to generate a response to send back to the person who requested it.
Express routing basics
Express routing refers to taking incoming requests and a path that is requested, and matching that to some code and some response. For example, a path can be www.url.com/pathname and serving up that page.
                    app.get('/', (req, res) => {

                    res.send('This is the
                    homepage');

                    })


                    app.get('/shop', (req, res) => {

                    res.send('This is the
                    shop page');

                    })


                    // Below sets a get request for all requests, good for 404 pages. Make sure to add at the end.

                    app.get('*', (req, res) => {

                    res.send('This is a 404
                    page');

                    })
Express path paremeters
We can set paremeters using the : in the path to send the right pages/data to the user.
                    app.get('/r/:subreddit',
                    (req, res) => {

                    const { subreddit } = req.params;

                    res.send('Browsing the
                    ${subreddit} subreddit');

                    })
Working with query strings
Express creates an object called query within the request object. The query object will hold key value pairs based on the query string.
                    app.get('/search',
                    (req, res) => {

                    const { q } = req.query;


                    if (!q) {

                    res.send('Nothing
                    found');

                    }

                    res.send('Search results for
                    ${q}');

                    })
Auto-restart with Nodemon
To restart the server automatically with Nodemon we need to use that when starting the server instead of Node in the terminal.
nodemon THE APP NAME
Templating with EJS
What is templating
Templates allows us to define a preset 'pattern' for a webpage, that we can dynamically modify. Same as in Elementor, when we create a template such as a header, footer blog page or shop page.
We can create logic in the HTML for JS to create certain HTML elements in certain states, such as sign in or sign out buttons
Installing EJS
-
In the terminal;
npm i ejs - Then make a folder called 'views' in the project directory that Express will look for.
- In the views folder, make a file called 'home.ejs'
- Then we can write our EJS in the home.ejs file
To include EJS in express
In the index.js file;
app.set('view engine', 'ejs');
Adding webpages to express routes
- First, we need to have all ejs files within the views folder.
- in the index.js file;
                            app.get('/',
                            (req, res) => {

                            res.render('home');

                            })
Setting the views directory
In index.js
                    const path = require('path');

                    app.set('views',
                    path.join(__dirname, '/views'));
Basic EJS syntax
Below outputs the javascript value into the HTML
                    <p> Hello world <%= 4 + 5 + 1 %>
                    </p>

                    Outputs => Hello world 10
Passing data to Templates
The best practice is to write the javascript logic in the js files not the ejs files, then to just reference them in the ejs files to keep the ejs file clean.
                    app.get('/random', (req,
                    res) => {

                    const num =
                    Math.floor(Math.random() * 10) + 1;

                    res.render('random',

                    rand : num

                    });
Then we reference rand in the ejs file
Conditionals/Loops in EJS
To add conditional JS in the HTML, we us the tags below. These tags will not render anything on the page, but allows us to add logic and then add html within this to render different things based on the logic written.
<% CODE HERE %>
Serving static assets in Express
To include static assets such as css files, js files, images etc, we need to serve them within the index.js file and then link them in the html file.
- Create a folder called public
- Add all of the static assets within the publoc folder
- Add this in index.js
app.use(express.static(path.join(__dirname, 'public'))); - Link the static assets within the HTML file - No need to add the public folder to the file path.
Partials in EJS
Partials allows us to add templates within templates, such as having a header partial and including the header in all of the pages.
To add partials in EJS;
- Create a partials folder in the public folder.
- Create partial files
- In pages where we want to add a partial, add;
                            <%- include('file
                                path') %>
EJS Mate NPM Package
EJS Mate is an NPM package that can help us add partials more easily
Instead of creating partials and referencing header, nav, footer etc in every page, EJS Mate does the opposite. You create the boilerplate in boilerplate.ejs where you reference the body, then in every page, just include the layout function and start coding
- Require EJS Mate
- Set the engine
app.engine('ejs', ejsMate) - In views directory, define a new folder called layouts
- In the layouts folder, create a file, boilerplate.ejs
- In the boilerplate.ejs in the body tag, reference the body
<%- body %> - In another template, Remove everything (including body tags) apart from the body and at
the top, add;
<% layout('layouts/boilerplate.ejs') %> - In the views directory, create a partials folder.
- In the partials folder, add partials such as navbar.ejs
- In boilerplate.ejs, include our partial
<%- include('../partials/navbar.ejs') %>
Defining RESTful routes
Get vs Post requests
Get Requests
- Used to retrieve or get information
- Data is sent via a query string in the URL
- Information is plainly visible in the URL
- Limited amount of data can be sent
Post Requests
- Used to post data to the server
- Used to write/create/update
- Data is sent by a request body, not a query string
- Can send any sort of data(JSON)
Parsing the request body
When handling post requests we need to tell express what type of post data to expect to parse. Without this, express will not know how to parse the data.
- Form data
- JSON data
                        app.use(express.urlencoded({ extended: true
                        }));
app.use(express.json());
Intro to REST
- R representational
- E
- S state
- T transfer
REST is a set of guidelines for how a client & server should communicate and perform CRUD operations on a given resource.
The main idea of REST is treating data on the server-side as resources that can be CRUDed
The most common way of approaching REST is in formatting the URLS and HTTP verbs in applications.
- C create
- R read
- U update
- D delete
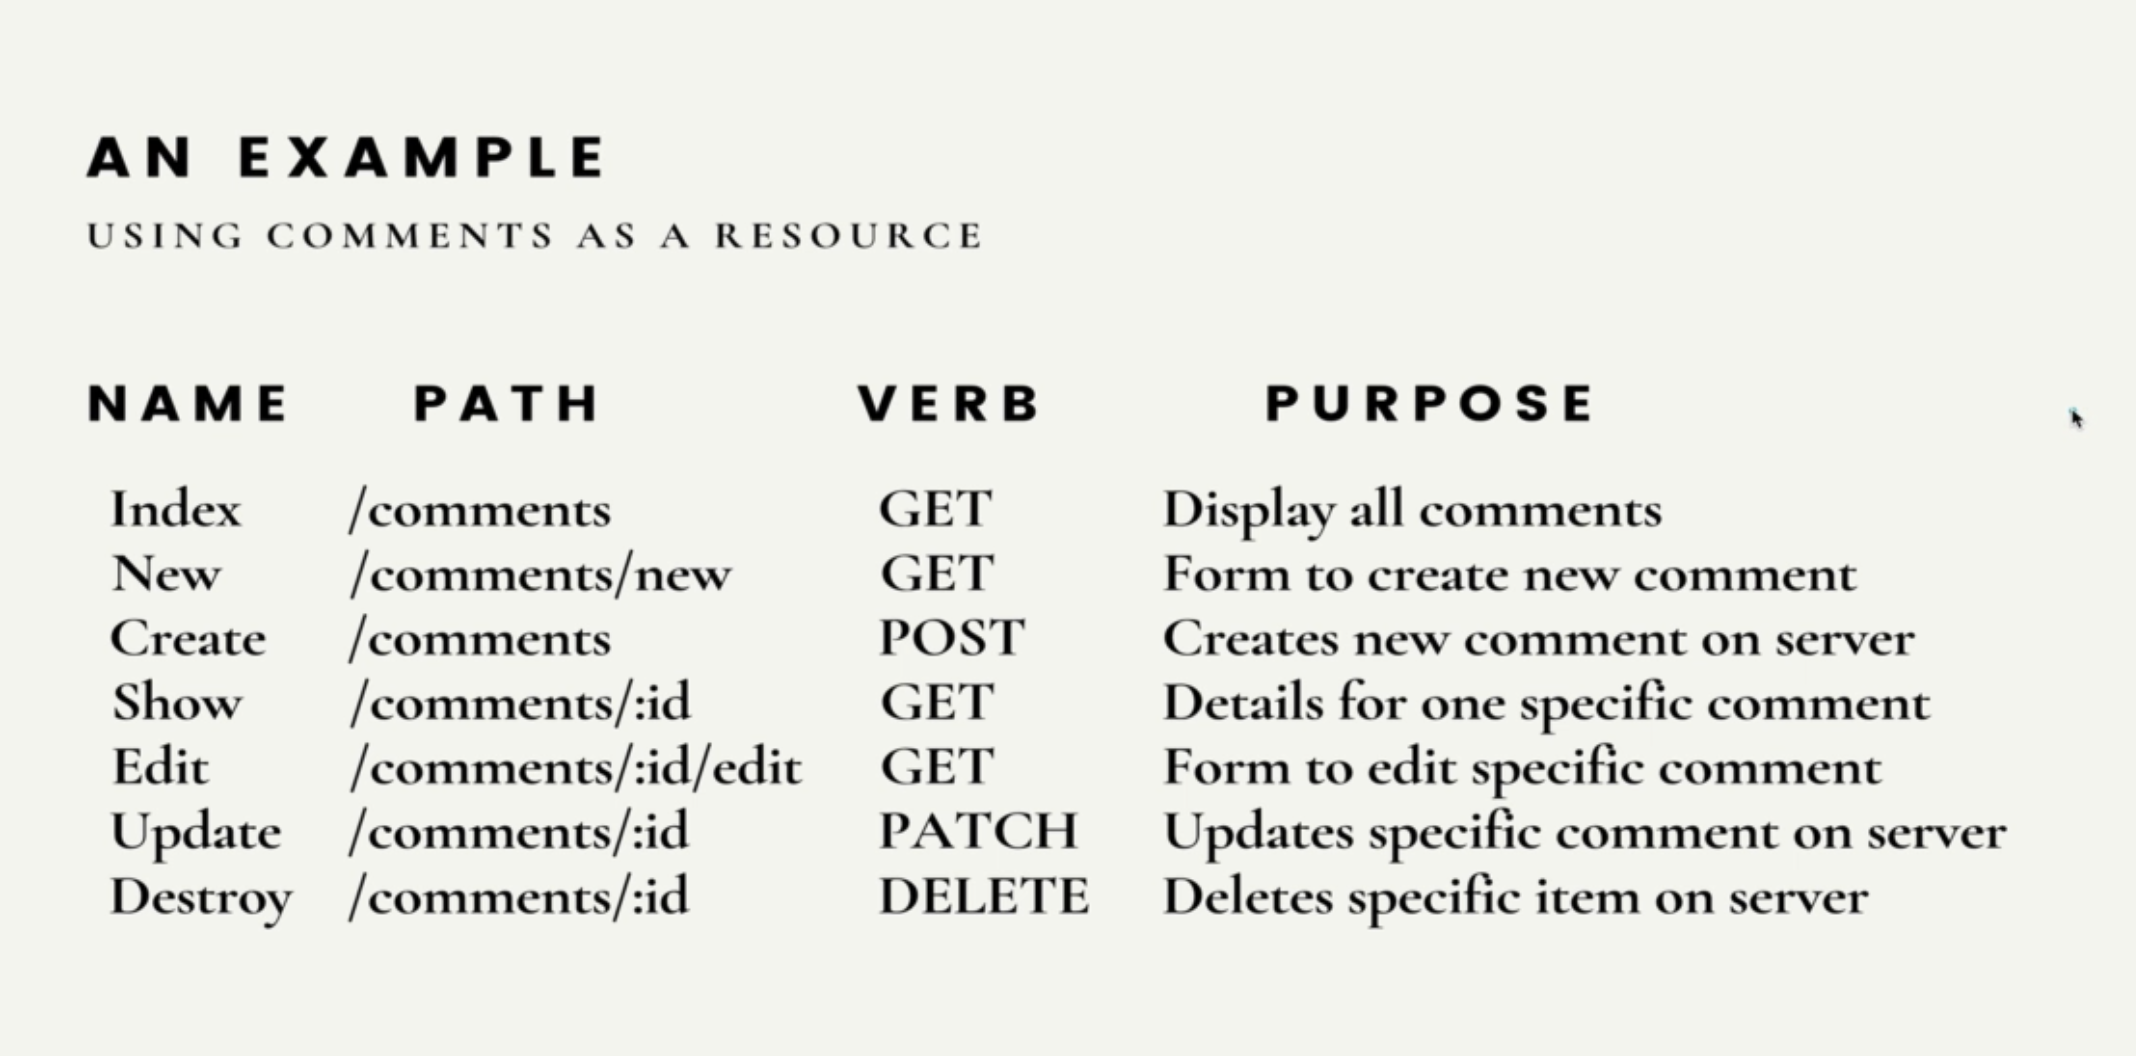
One way to follow the REST guidelines is;
                    GET /comments - list all comments


                    POST /comments - create a new
                    comment

                    GET /comments/:id - view one
                    comment (by ID)

                    PATCH /comments/:id - update a
                    comment

                    DELETE /comments/:id - delete a
                    comment
Setting up get index route (To show a list of data)
- Add a GET request to /comments in index.js that renders the index.ejs file
- Create an index.ejs file in the views folder
- In the index.ejs file, loop over the resource. For example, loop over all comments.
Setting up the create/new routes (To add data to a list of data)
We need to set up 2 routes, one (new route) will serve the form to create new comments.
- Make a NEW route
- Add a GET request to /comments/new in index.js that renders the new.ejs file
- Create an new.ejs file in the views folder
- Make sure we tell express to parse form data
- In the new.ejs file, add a form
- In the form;
- Change the action to /comments
- Change the method to POST
- Add name and id for each input to reference in the post route
- Make a POST route
- Add a POST request to /comments in index.js that ...
- Extract the form data from the request body
- Push the new data to the database
- Redirect the user back to the list of comments from the form page
                                const { username,
                                    comment, id: uuidv4() } = req.body:
res.redirect('/comments');
Setting up a show route (To show an expanded view of an item in a list, eg. an AirBNB listing)
- Add a GET request to /comments/:id
- Take the ID from the URL
- Find the correct comment and parse the number if its a number
- Render the show page with expanded details such as an AirBNB listing and pass through the comment ID so we can use it within the show.ejs file.
- Make a show.ejs file in the views folder.
- Add relevant HTML within the show.ejs file to create the show page.
                        const { id } =
                        req.params:
                        const comment =
                        comments.find(c => c.id === parseInt(id));
res.render('comments/show', { comment });
The UUID package
The UUID package allows us to create unique IDs automatically for all user generated comments or posts
- Install the UUID package npm i uuid
- Require the UUID package in the index.js file
const { v4: uuidv4 } = require('uuid'); - Add the function below to where we want to create a new id, such as in hardcoded comments or when we post new comments with the comments.push
uuidv4();
How to update comments
- Add a PATCH request to /comments/:id
- Take the ID from the URL
- Save the new comment that is sent in the req.body payload to a variable
- Find the correct comment
- Update comment to new comment text
- Redirect the user back to the list of comments from the form page
                        const { id } =
                        req.params:
                        const newCommentText =
                        req.body.comment;
                        const foundComment =
                        comments.find(c => c.id === id);
                        foundComment.comment =
                        newCommentText;
res.redirect('/comments');
After the above, we need to create a form for the user to update their comment. The issue is HTML forms can only send GET or POST requests, so we need to fake it so send a PATCH request.
- Add a GET request to /comments/:id/edit
- Take the ID from the URL
- Find the correct comment based on ID in the URL
- Render the form page and pass through the comment in the form for the user to edit.
- Create edit.ejs file in the views/comments folder.
- Create the form inside of the edit.ejs file.
                        const { id } =
                        req.params:
                        const comment =
                        comments.find(c => c.id === id);
res.render('comments/edit', { comment };
Finally, to get the HTML form to accept a PATCH request, we need to;
- Install method overide package.
- Override the method using a query string value
- Require Method Override
- Call the app.use function to use the middleware
- In the HTML forms action attribute, add the following to the end (make sure the default method of form is set to POST)
const methodOverride = require('method-override');app.use(methodOverride('_method'));?_method=PATCH
How to delete comments
- Add a DELETE request to /comments/:id
- Take the ID from the URL
- Filter all comments that is not the one we want to delete and filter it into a new array (We do this when not working with databases)
- Redirect the user back to the list of comments
- Add delete button where needed by;
- Adding a from with a method of POST
- Change the action attribute to /comments/:id?_method=DELETE to override the POST request to DELETE
- Add the button inside the form
                        const { id } =
                        req.params:
                        comments =
                        comments.filter(c => c.id !== id);
res.redirect('/comments');
Express Middleware
Express Middleware are functions that run during the request/response lifecycle
Middleware
- Middleware are just functions
- Each Middlware has access to the request and response objects
- Middleware can end the HTTP request by sending back a response with methods like res.send()
- OR middleware can be chained together, one after another by calling next()
Morgan - Logger Middleware
Morgan helps us log HTTP request information to our terminal which is very useful when debugging.
To install Morgan
- Install from NPM
- Require Morgan
- Execute Morgan using app.use
Defining our own Middleware
We use the Next keyword to tell the Middleware to go to the next thing.
                    app.use((req, res,
                    next) => {

                    console.log('This is my first Middleware')

                    return next()

                    })
Setting up a 404 route
- Add a res.use function at the end of the express app (before the .listen) - 404 page will run if the request does not match anything else.
- In the function, write - res.status(404).render() - this will set status code to 404 and render 404 page
Adding Middleware to specific routes
If we need to add Middleware to specific routes such as verifying passwords, instead of using app.use we can create functions and save as a variable, then pass the variable into the .GET or other routes after defining the route but before defining the function for that route
Handling errors in Express
Express' built in error handler
Express error handler is something built into Express to handle errors and send back an internal error response.
We can throw our own errors
throw new Error()
Defining custom error handlers
We can define error handling middleware functions, just like any other middleware, just with 1 distinction, error handling have four functions instead of three (err, req, res, next)
We put error handling middleware last, after all the other app.use functions
If we do not pass any argument into next() then the next available code will run, if we pass an argument into next(err) then only the next error handling middleware will run.
                    app.use((err, req,
                    res, next) => {

                    const = {status = 500, message = 'Something went wrong'} = err

                    console.error(err.stack)

                    res.status(status).send(message)

                    return next(err)

                    })
Our custom error class
- Make a new file such as AppError.js
-
                            class AppError extends Error {

                            constructor(status, message) {

                            super()

                            this.message = message

                            this.status = status

                            }

                            }


module.exports = AppError - In the app.js
-
const AppError = require('./AppError') - Set up an error handling route
-
                                app.use((err,
                                req,
                                res, next) => {

                                const = {status = 500, message = 'Something went wrong'} = err

                                res.status(status).send(message)

                                return next(err)

}) - Where we need to throw error
-
throw new AppError(401, 'password required')
Handling Async Errors
Below is for when we want to force errors such as when the user is not logged in or needs a password
To handle errors in Async functions we need to pass the error to the next error handler instead of handling the error directly in the function
                    app.get('/', async (req, res, next) => {

                    return next(new AppError(404, 'Product not found'));

                    })


                    // need to have an error middleware at the bottom of the file to pass the error to.
Below is for when users may cause errors such as not filling in all required information
We can use the try/catch method
                    app.get('/', async (req, res, next) => {

                    try {

                    // code goes here

                    } catch (err)

                    next(err)

                    }

                    })
When we want to throw an error within a try/catch, we can just add throw new instead of return next
We typically want to wrap everything in try/catch anytime we use an async function as Express can usually handle non-async errors but cannot handle async errors by default.
Defining an Async utility
Instead of typing a try/catch over and over again in all of our async functions, we can create a function that passing in another function and chains a .catch so all we have to do then is wrap our async functions in this function instead of writing try/catch over and over.
Simply, we create a function wrapAsync that returns a new function (whatever we need to write) and adds a .catch
                    function wrapAsync(fn)
                    {

                    return function (req, res,
                    next) {

                    fn (req, res, next).catch(err => next(err))

                    }

                    }


                    app.get('/', wrapAsync(async (req, res, next) =>
                    {

                    // code goes here

                    }))
Differentiating Mongoose Errors
Mongoose has names for different types of errors, we can take those names and make functions to handle those errors differently.
                    const handleValidationErr = err =>
                    {

                    console.dir(err)

                    return new AppError(400,
                    'Validation Failed ... ${err.message}')

                    }


                    app.use((err, req, res, next) => {

                    console.log(err.name)

                    if (err.name === 'ValidationError') err = handleValidationErr(err)

                    next(err)

                    })
Defining our Error template
- Create a file, error.ejs in the views folder.
- Create content for error page
- Render error page in our error route within app.js
JOI validator tool
Joi is a middleware that helps us validate our data on the server side to throw specific errors easily depending on the data validations we set
- Install npm package
- Require Joi
- Define schema
                    // Creating Joi Schema

                    const campgroundSchema = Joi.object({

                    campground: Joi.object({

                    title: Joi.string().required(),

                    price: Joi.number().required().min(0),

                    image: Joi.string().required(),

                    location: Joi.string().required(),

                    description: Joi.string().required()

                    }).required()

                    })

                    const {

                    error

                    } = campgroundSchema.validate(req.body)

                    if (error) {

                    const msg = error.details.map(el => el.message).join(',')

                    throw new ExpressError(400, msg)

                    }
Express Router
Express router allows us to organize our routes and minimize duplication.
- Make a folder called Routes
- Add a JS for for each router
                    const express = require('express')

                    // makes a new router and saves it to a variable

                    const router = express.Router()


                    router.get('/posts', (req, res) => {

                    // Route code goes here

                    })


                    module.exports = router
In the index.js file
                    const postRoutes = require('./routes/posts')

                    // the '/posts' allows us to name all the routes so we do not have to repeatedly type them in every
                    route.

                    app.use('/posts', postRoutes)
We can add middleware to apply to only certain routes by writing them with router.use within the single js file ofr the routes. For example, require authentication for admin routes.
Express sessions & Flash
Introduction to sessions
It's not very practical or secure to store a lot of data client-side using cookies.This is where sessions comes in.
Sessions is a server side data store that we use to make HTTP stateful. Instead of using cookies, we store the data on the server-side and then send the browser a cookie that can be used to retrieve the data.
Installing Express Sessions
- Install NPM package express-session
- Require it
- Add a secret so sessions can sign the cookies
app.use(session({ secret: 'thisisnotagoodsecret'})) - Then we have access to req.session to use in our app
- We can add anything to req.session and that data will be stored in the data store.
Introduction to Flash
A place in a session to flash a message to a user. Such as a success or confirmation message.
- Install and require connect-flash
- After the sessions code add app.use(flash())
- Now we have access to req.flash to use for flash messages.
- We add req.flash messages before the redirect and on the next page, we pass in the message. Or use res.locals middleware.
List of sources
- Colt Steeles web
developer bootcamp 2021