Introducing the world of the DOM
DOM Introduction
Dom stands for;
- D - Document
- O - Object
- M - Model
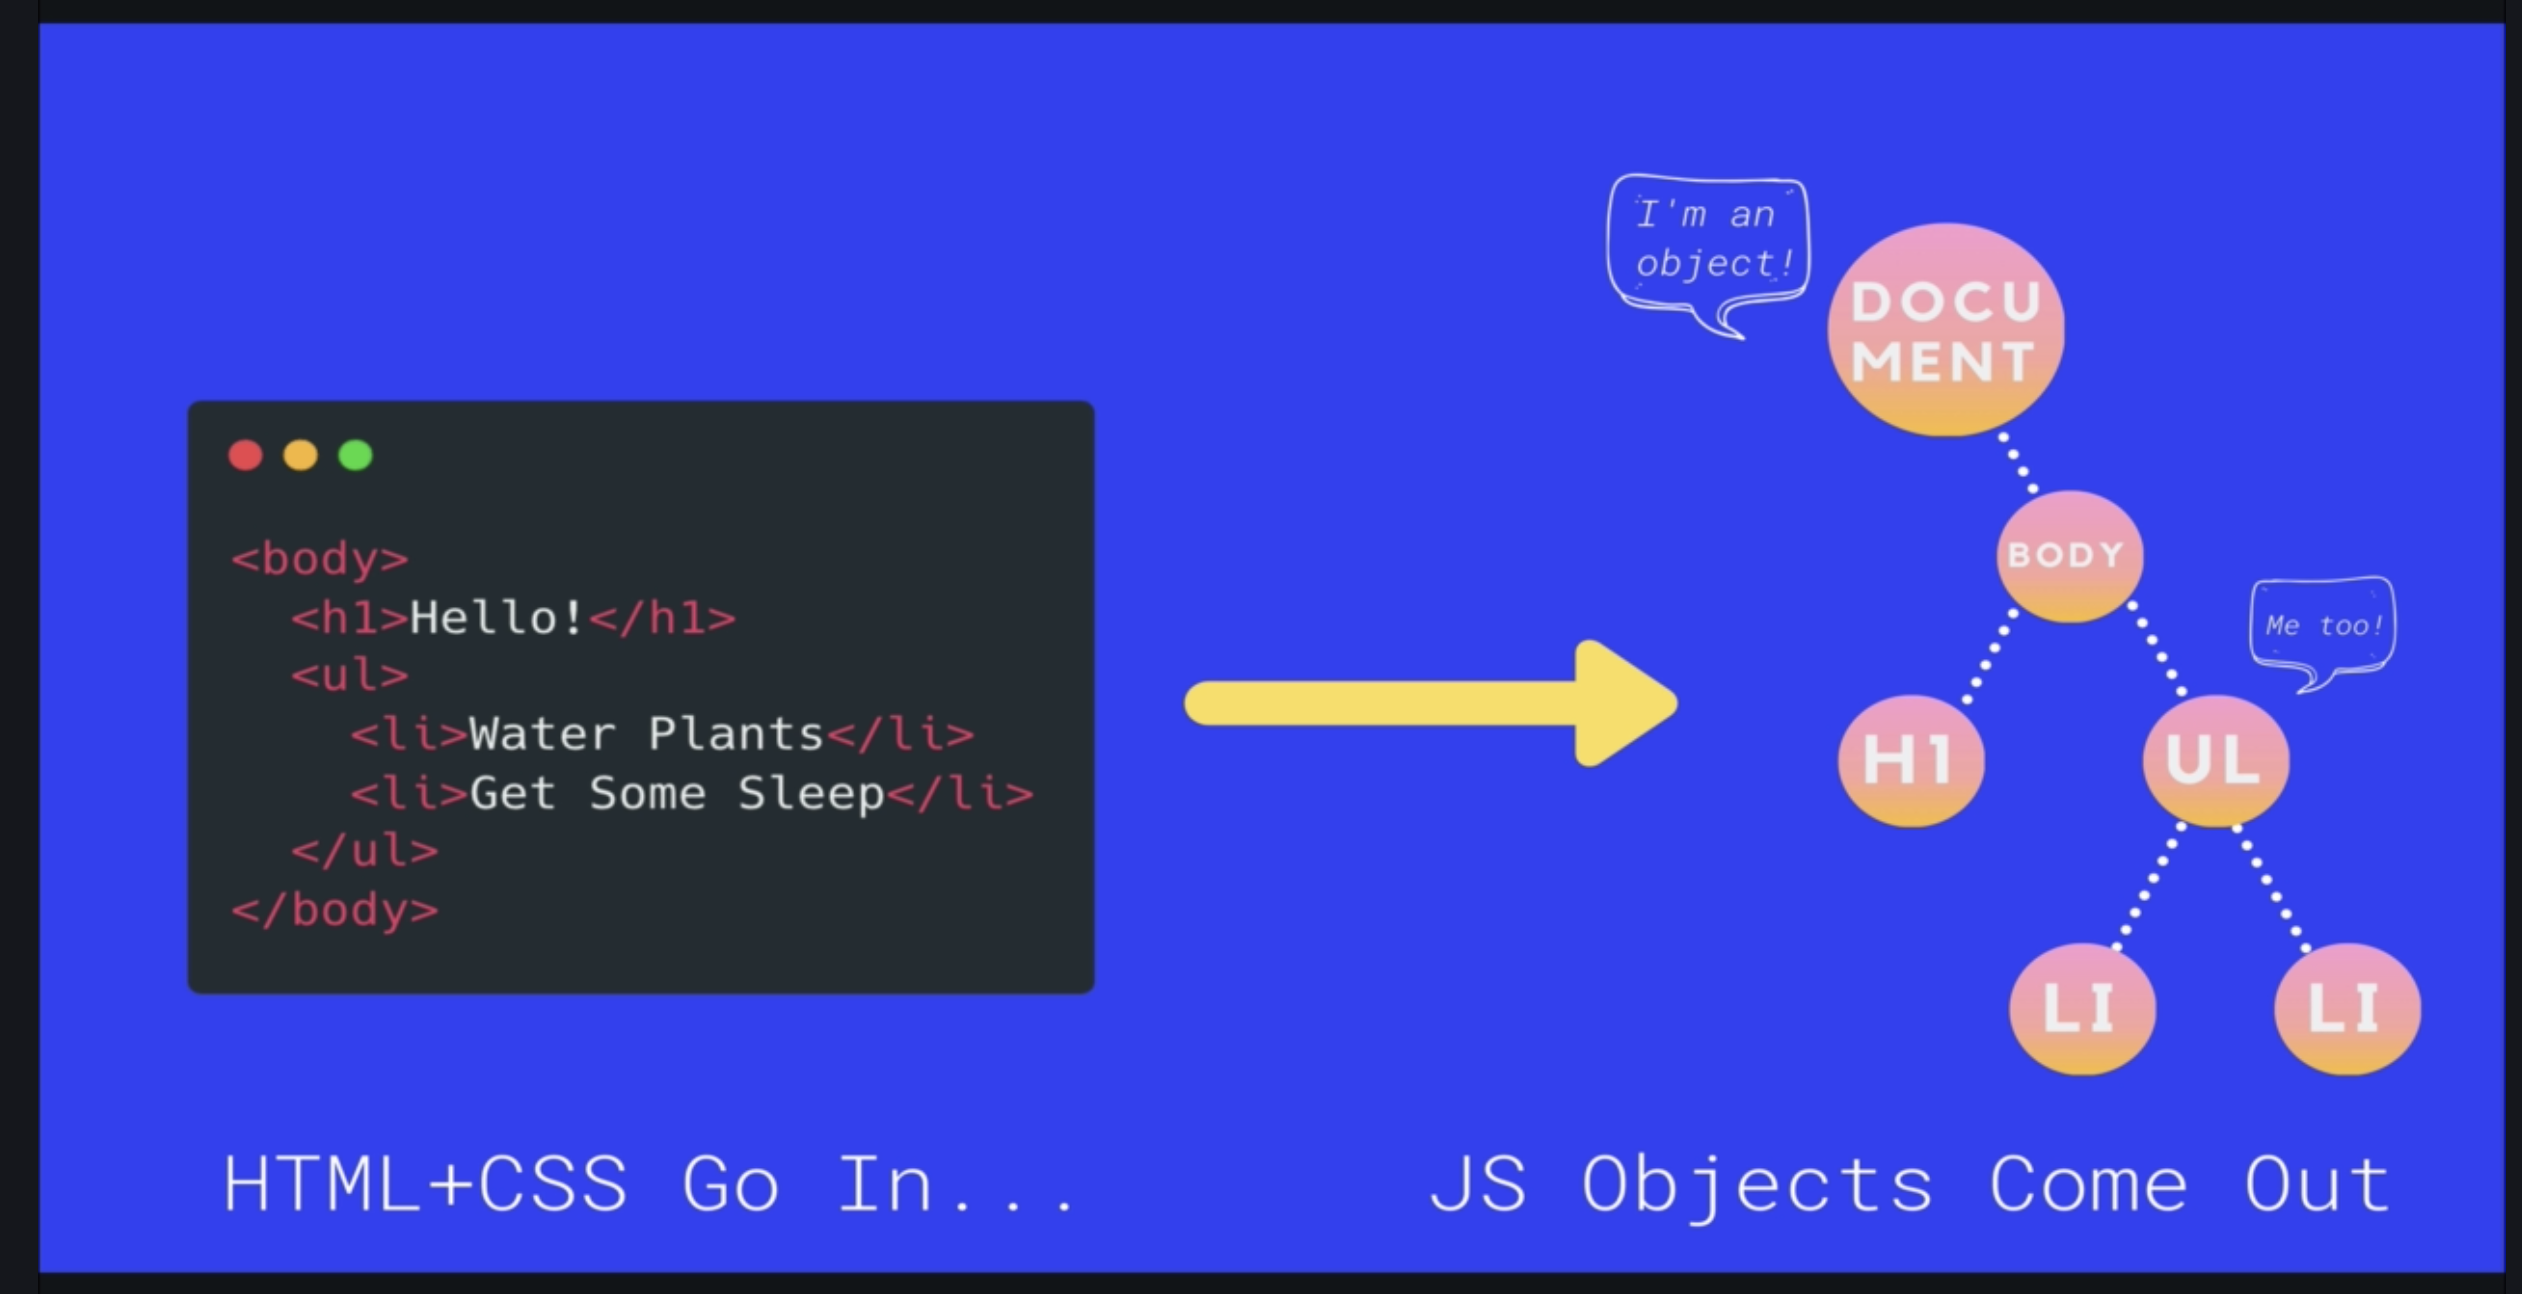
The DOM is a Javascript representation of a webpage. It's just a bunch of objects that you can interact with vis JS.
The DOM is how JS accesses/interacts with the HTML.
The document object
When a webpage is loaded, the html and css gets loaded and the html & css creates a bunch of JS objects based upon the elements and styles.
The document object is an object that is the entry point into the DOM which contains representations of all of the content on a page, plus tons of useful properties and methods.
Selecting Elements
When we select something from the DOM, we do not select the HTML code, we select the DOM object literal which has any properties within, and that allows us to manipulate the properties within the object literals.
Some selecting methods are;
- getElementById
- getElementsByTagName
- getElementsByClassName
Query Selector is a better and newer way to select elements from the DOM.
getElementById
getElementById allows us to select a html element by its ID.
                    document.getElementById('HTML
                    ID goes here')
getElementsByTagName
getElementsByTagName and getElementsByClassName selects multiple HTML elements and returns a HTML collection. A HTML collection consists of multiple objects representing the HTML elements with each HTML element having their own subset of properties to manipulate.
                    document.getElementsByTagName('img');

                    // Returns a HTML collection containing all images.
getElementsByClassName
                    document.getElementsByClassName('HTML Class name goes here');

                    // Returns a HTML collection containing all HTML elements that has the HTML class.
querySelector
A newer, all-in-one method to select a single element.
Within the parenthesis, we can select elements in the exact same way we select elements within CSS.
                    document.querySelector('h1');

                    // Finds first h1 element.


                    document.querySelector('#red');

                    // Finds the first element with the ID of red.


                    document.querySelector('.big');

                    // Finds the first element with the class name of big.


                    document.querySelector('img:nth-of-type(2)');

                    // Finds the second image element.
querySelectorAll
Same as querySelector but returns all HTML elements, not just the first one.
                    document.querySelectorAll('h1');

                    // Finds all h1 elements.
Manipulating Elements
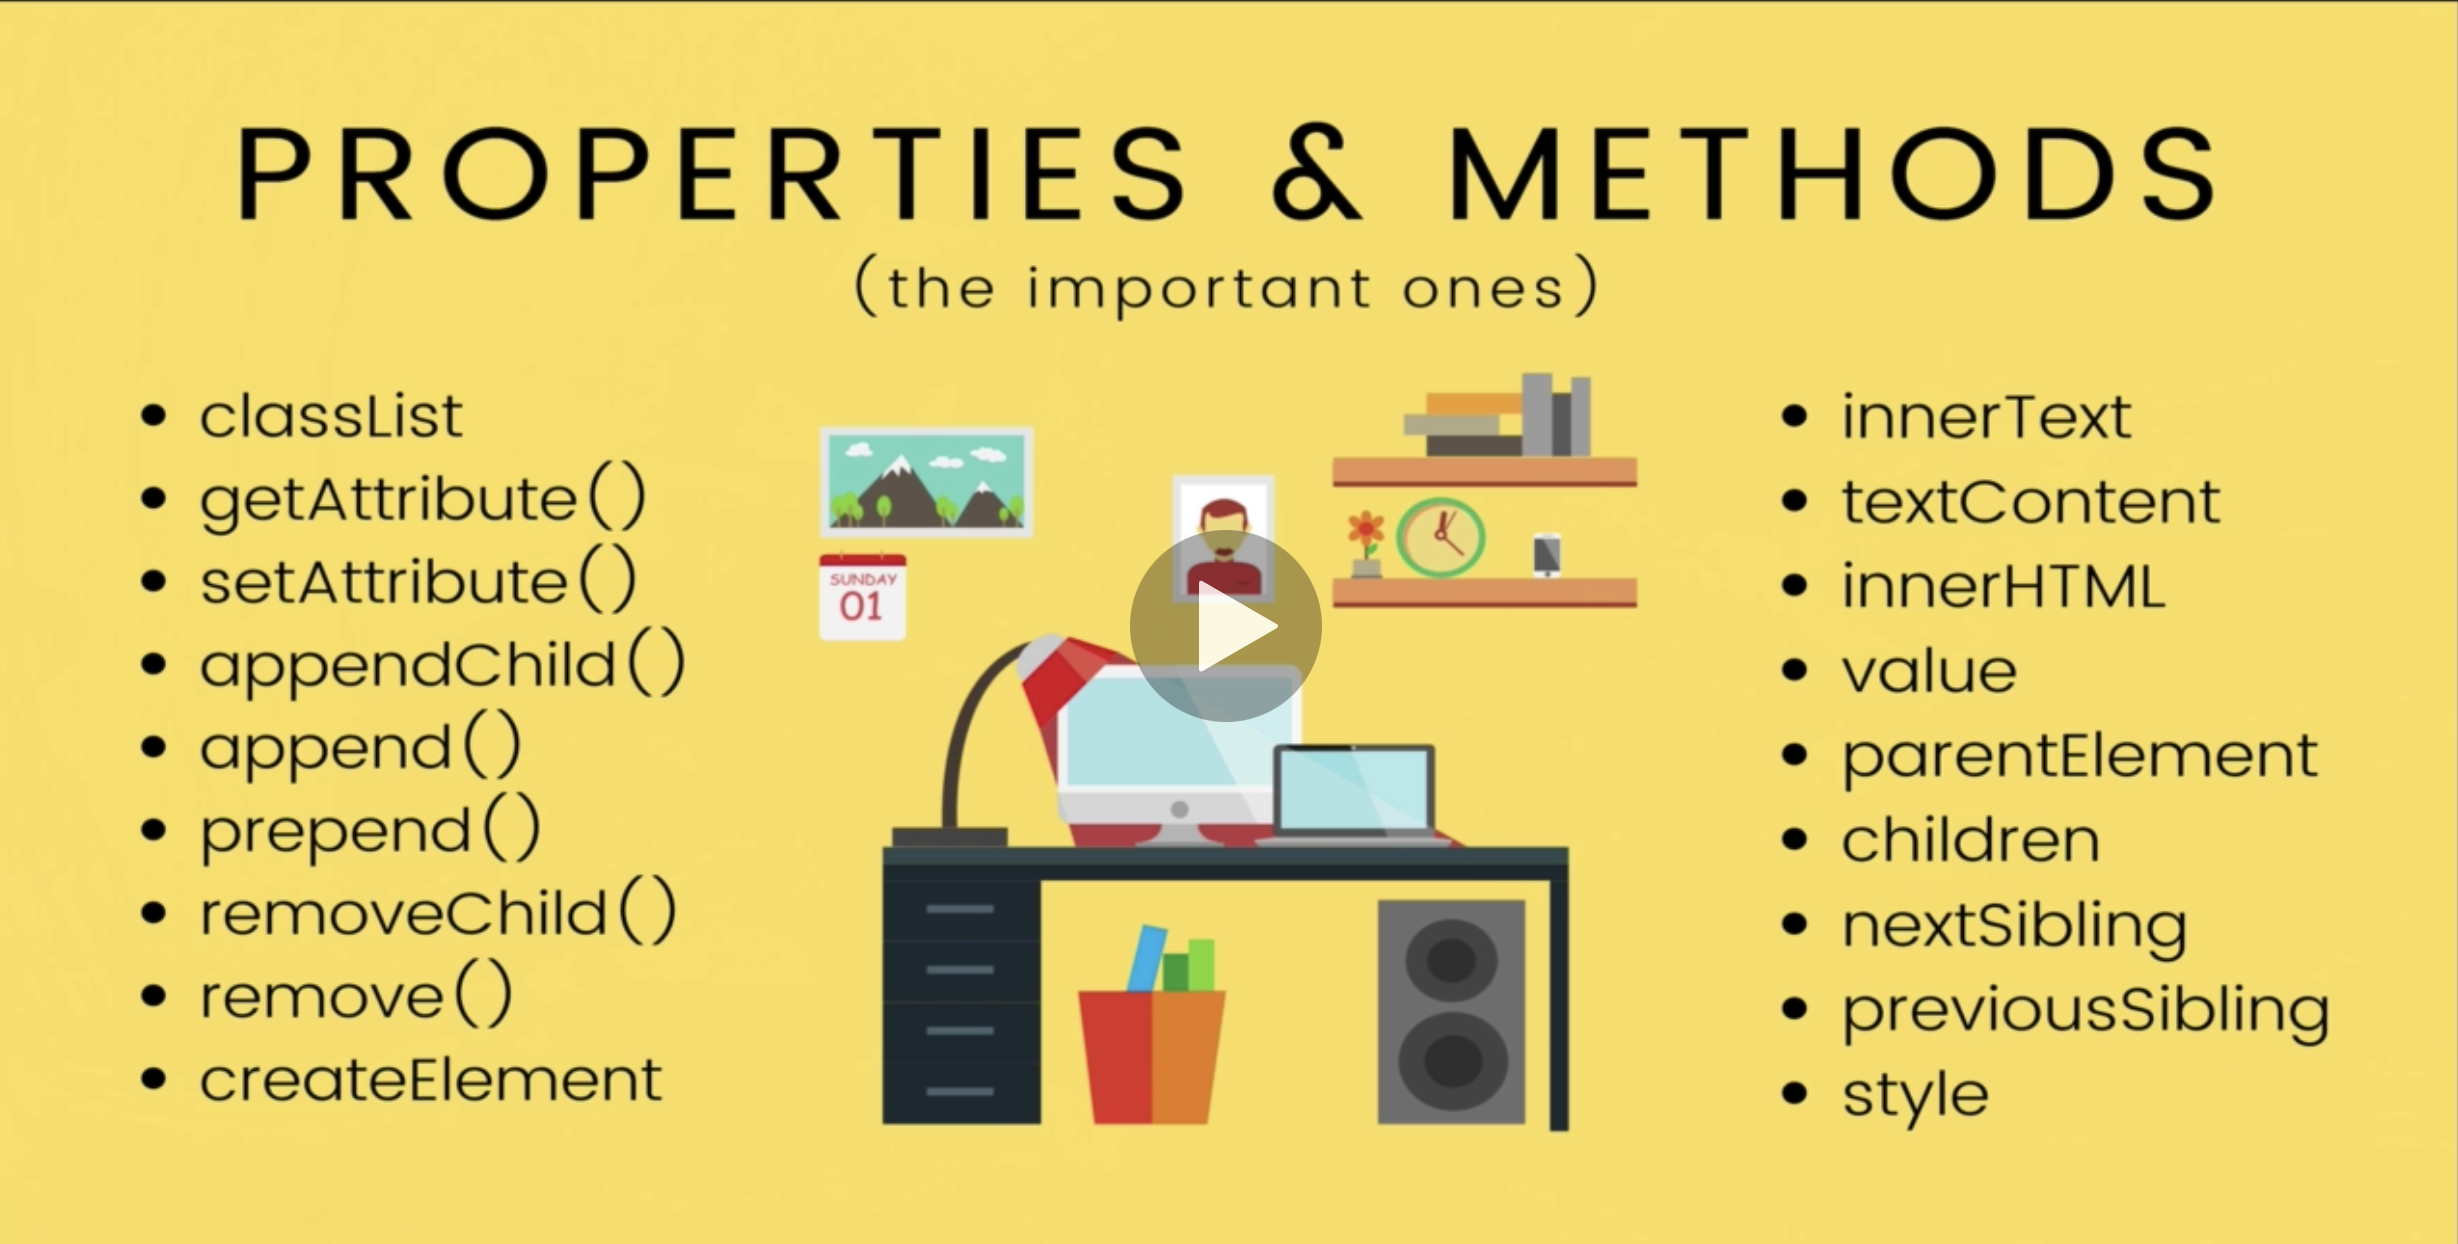
innerHTML, textContent, innerText
textContent selects all of the text between the opening and closing html tags.
innerText does the same as textContent but only returns what is seen on the webpage, meaning, if a part of text has display set to none, innerText will not return that snippet of text.
innerHTML selects all of the text between the opening and closing html tags, including HTML tags. Useful for when we want to update/change the inner HTML such as adding bold tags or italic tags.
                    const tocLinks = document.querySelectorAll('#toc a');


                    // Changes the text of all links within the table of contents

                    for (let link of tocLinks) {

                    link.innerText = 'I AM A LINK!'

                    }
Accessing Attributes
We can get and change attributes with the following methods;
- getAttribute
- setAttribute
                    const firstLink = document.querySelector('a');


                    firstLink.getAttribute('title');

                    // Returns the title of the link.


                    firstLink.setAttribute('title', 'New title here');

                    // Sets a new title of the link.


                    // We can also access and change attributes like this

                    firstLink.title = 'New title here';
Changing Styles
Style Property
There is a style property to change styles of elements.
                    const h1 = document.querySelector('h1');


                    h1.style.color = 'red';

                    // changes the color of the h1 to red
This method writes inline styles and is not preferred.
We can get styles from the CSS by doing this;
                    window.getComputedStyle(h1);

                    // This will return a collection of all styles applied to the h1.


                    window.getComputedStyle(h1).color;


                    // This will return the color of the h1. <
classList
A better way to change styles with JS is creating CSS classes with the right styles and manipulating those using the classList
The classList is an object to store and manipulate the classes of an element.
                    const h2 = document.querySelectorAll('h2');


                    h2.setAttribute('class', 'purple');

                    // Sets the css class of the h2's to purple (This method will delete other classes on the h2 element)


                     h2.classList.add('purple');

                     // Adds the css class purple to the h2's without deleting others


                     h2.classList.remove('border');

                     // Removes the css class border from the h2's


                     h2.classList.toggle('purple');

                     // Toggles the css class purple on and off
Traversing parent / child / sibling
- parentElement
- children
- nextElementSibling
- previousElementSibling
                    const firstBold = document.querySelector('b');


                    firstBold.parentElement;

                    // Selects the parent of the first bold element


                    paragraph.children;

                    // Returns a HTML collection with a list of children elements


                    paragraph.children[0];

                    // Selects the first child of the paragraph element


                    paragraph.nextElementSibling;

                    // Selects the next sibling element of the paragraph
Append & AppendChild
append or appendChild are about adding new elements to a page. To add a new element, we use the following method;
- document.createElement('img')
append and prepend methods add new elements as child elements however insertAdjacentElement method adds new elements as adjacent siblings to the target element.
                    const newH3 = document.createElement('h3');

                    newH3.append = 'I am a new h3';


                    document.body.appendChild(newH3);

                        // Appends the new h3 element as the last child of the body.


                        document.p.append('I am new text', 'I am also new text');

                        // Appends new text to the end of the paragraph element.


                        document.p.preppend('I am new text', 'I am also new text');

                        // Puts the new text at the start of the paragraph


                        h1.insertAdjacentElement('afterend', h2);

                        // Inserts a h2 after the h1
There are new methods, targetElement.after, targetElement.before, targetElement.remove, targetElement.replaceWith(new element) which are easier to use to add, remove and replace elements.
remove & removeChild
targetElement.removeChild(childElement) removes a child from the element (we have to target the parent of the element we want to remove)
targetElement.remove() removes the targeted element.
DOM Events
Some DOM events are;
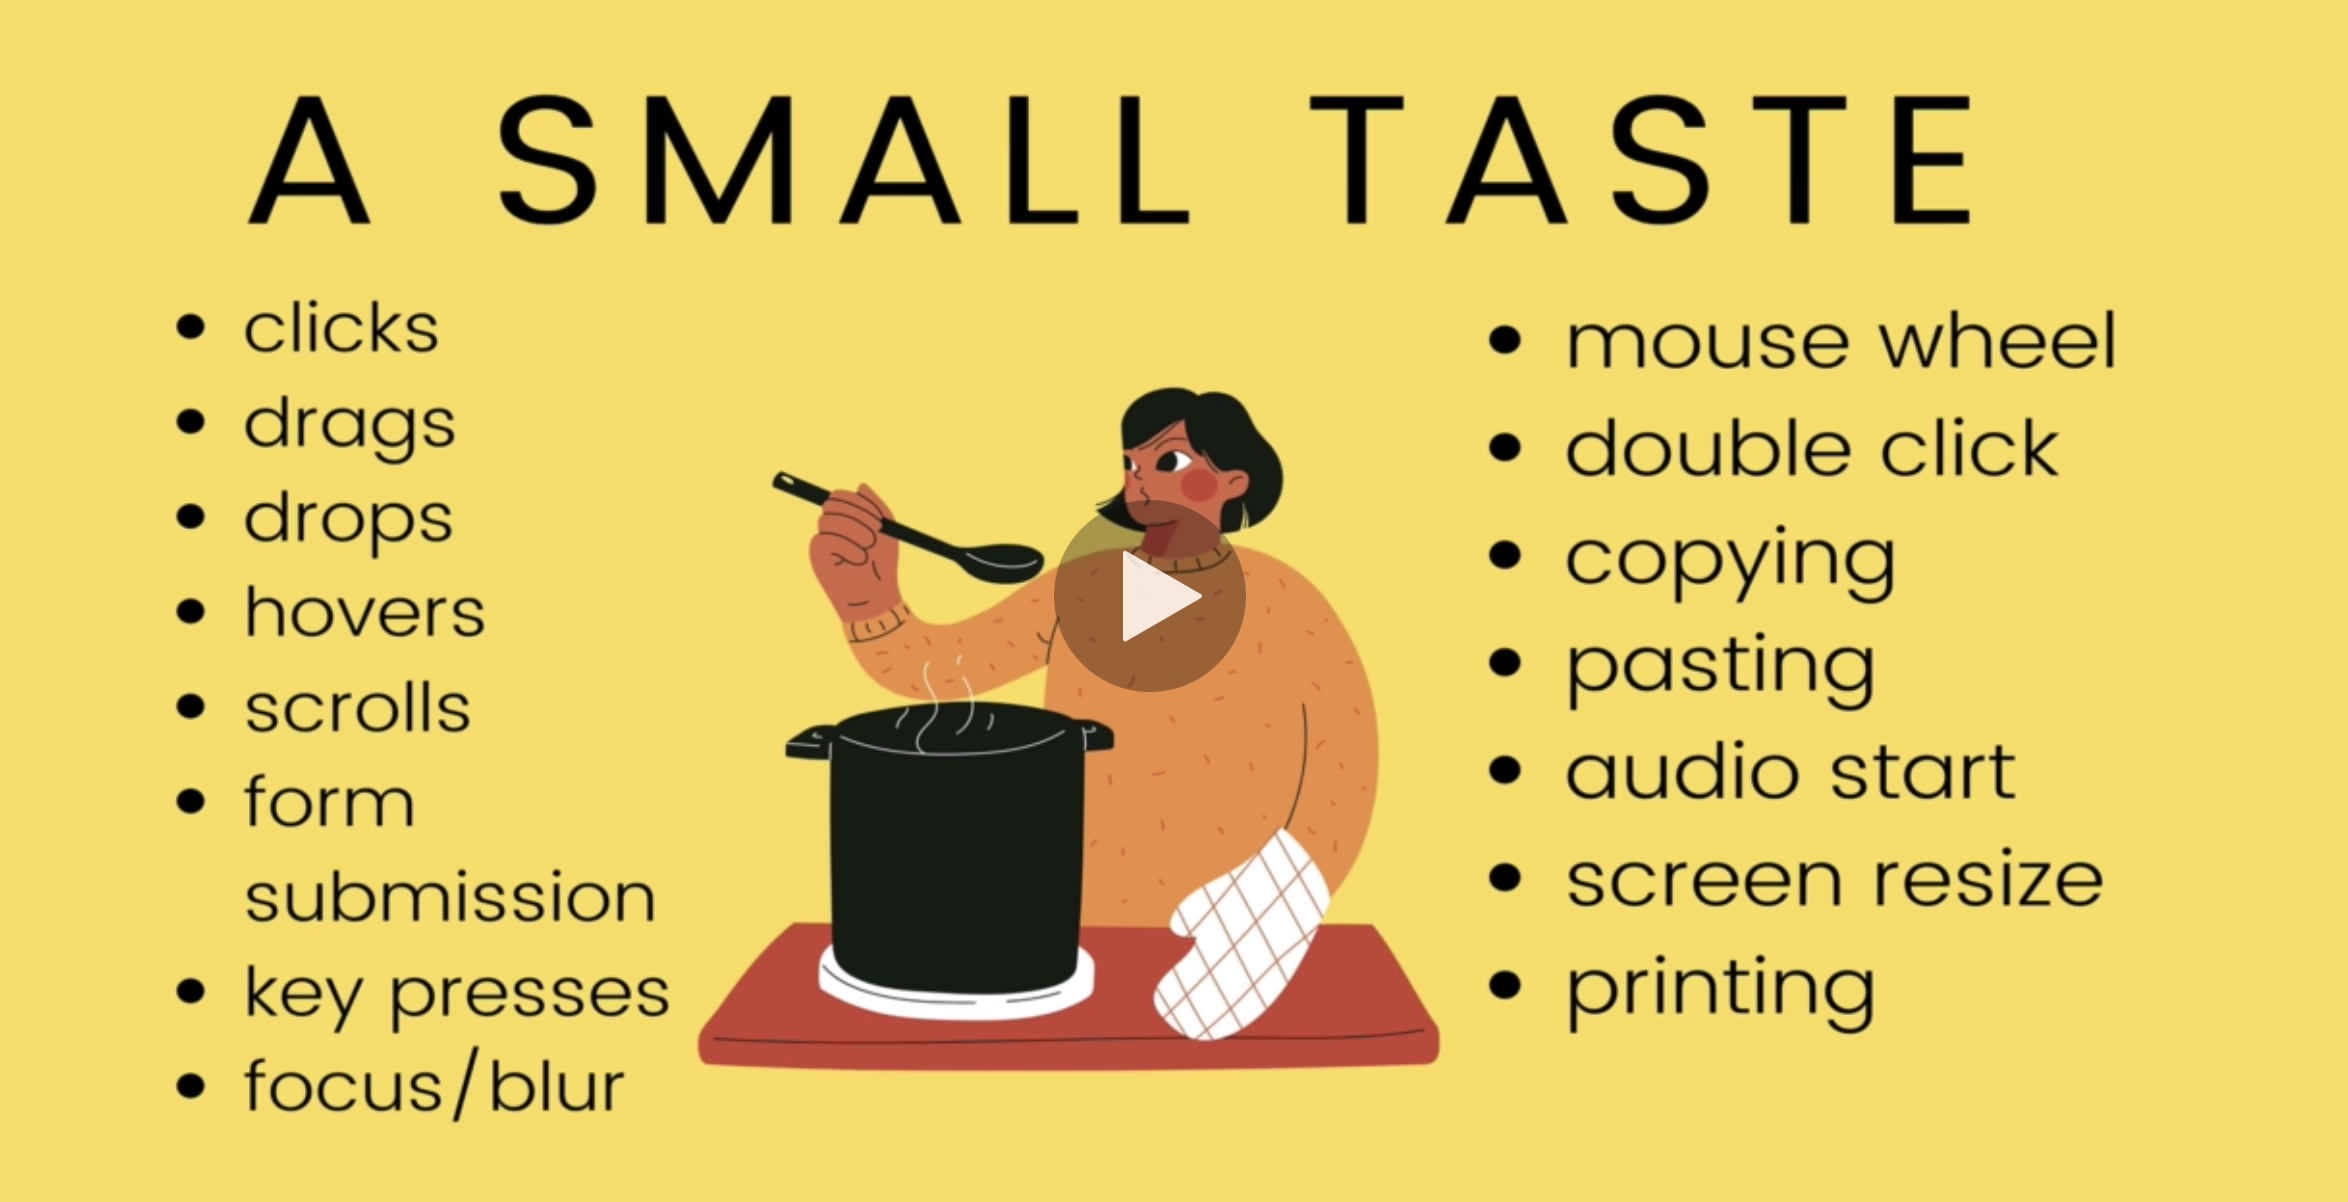
We need to wrap all events in functions otherwise they will run straight away instead of user events.
Inline events
We can write events directly in our HTML (Not recommended)
                    <h1>Events</h1>


                    <button onclick ="alert('you
                        clicked me!')">Click Me!</button>
The Onclick and other On Properties
Still not the best method.
                    btn.onclick = function() {

                    console.log("You clicked me!")

                    }
addEventListener
Best method to use for events.
                    btn.addEventListener('click', () => {

                    alert("You clicked me!!")

                    })
Events and the keyword this
Inside any event handler callbacks, the keyword this refers to whatever was clicked on or interacted with by the user that triggers the function being called.
Keyboard events & event objects
Event objects are objects with information about the event fired, we need this to access event properties to use for keyboard events. Event objects are passed into the addEventListener function.
We can listen for keyboard events in the entire window or a particular element.
                    window.addEventListener('keydown', function (eventObject) {

                    switch (eventObject.code) {

                    case 'ArrowUp':

                    console.log("UP!");

                    break;

                    case 'ArrowDown':

                    console.log("DOWN!");

                    break;

                    case 'ArrowLeft':

                    console.log("LEFT!");

                    break;

                    case 'ArrowRight':

                    console.log("RIGHT!");

                    break;

                    default:

                    console.log("IGNORED!")
                    })
Form events & preventDefault
Default behaviour of a form is to submit the form data somewhere, below we will stop that default behaviour and add the form data to the local page, this is handy for adding comments to the comment section etc.
The event to listen to is submit
The below example takes tweets submitted and appends submitted tweet to an unordered list.
                    const tweetForm = document.querySelector('#tweetForm');

                    const tweetsContainer = document.querySelector('#tweets');


                    tweetForm.addEventListener('submit', function (e) {

                    e.preventDefault();  // prevents the forms default action to submit and go to a new page, must be called on event object!

                    const usernameInput = tweetForm.elements.username;

                    const tweetInput = tweetForm.elements.tweet;

                    addTweet(usernameInput.value, tweetInput.value)

                    usernameInput.value = ''; // clearing form field after submitted

                    tweetInput.value = ''; // clearing form field after submitted


                    // Below is a function to add the tweet submitted to the list

                    const addTweet = (username, tweet) => {

                    const newTweet = document.createElement('li'); // creates a new li and stores it in newTweet

                    const boldTag = document.createElement('b'); // creates a new bold element and stores it in boldTag

                    boldTag.append(username); // Adds the username in the bold tags

                    newTweet.append(boldTag); // Adds the boldTag (which has the username in) in the newTweet li.

                    newTweet.append(`- ${tweet}`); // Adds the tweet in the newTweet li.

                    tweetsContainer.append(newTweet); // Adds the newTweet (which has the whole tweet) into the continer
Input and change events
The change and input events are both event types for inputs using addEventListener. The change event fires when the user types or makes changes in the input field and then clicks away from that field. The input event fires when the user types in the input field.
Event Bubbling
Event Bubbling is when event listeners are set on multiple elements nested inside of eachother, for example, having an event listener on a section and a paragraph nested inside the section and then a button nested inside of the paragraph. Once the event listener is fired on the button, the event listeners then get fired on the paragraph, and finally the section. This is event bubbling
                    button.addEventlistener('click', (e) => {

                    e.stopPropagation(); // this stops the event bubbling from occuring

                    })
Event delegation
One problem is that adding event listeners to elements only works on elements that are present when the page is loaded, if more elements are created and appended after the page load, event listeners for those new elements will not work.
Event delegation allows us to add event listeners to the parent, maybe a container, but still only fire the event listener when fired for the child element.
                    tweetsContainer.addEventListener('click', function (e) {

                    e.target.nodeName === 'LI' && e.target.remove();

                    })


                    // We added an event listener to the container, then we check if the element we clicked on is an LI, if it is, we then remove the LI that was clicked.
Async JS
The Call Stack
The call stack is basically how JS knows where it is when calling functions and knowing which function to call next.
- When the script calls a function, the interpreter adds it to the call stack and then starts carrying out the function.
- Any functions that are called by that function are added to the call stack further up and run where their calls reached.
- When the current function is finished, the interpreter takes it off the stack and resumes execution where it left off in the last code listing.
Web APIs & single threaded
Js is single threaded meaning JS cannot multitask and will only run one line of code at a time.
However, if one line of code takes 3 seconds to execute, this does not mean the rest of the codes waits, JS hands over requests to the browser which uses web API's to handle the tasks which allows the rest of the JS code to run whilst those tasks are being handled. Once the web API finishes the task, it hands it back over to JS which adds it to the call stack and then finishes executing the code.
Callback Hell
When working with Async JS we tend to make functions that are dependant on other functions, we then need to use callbacks to delay functions until the first function is finished, we then need to run additional functions just in case of errors occuring when fetching data etc, this results in complicated nested callbacks, referred to as callback hell
Fortunately, there are newer JS features called promises and async functions which makes this easier.
Promises
A promise is an object representing the eventual completion or failure of an asynchronous operation
The most common use of asynchronous operations is making requests and fetching data from an API.
A promise has 3 states;
- Pending
- Resolved
- Rejected
The whole point of promises is to run code when the API call is either successful or failed, the way we do this is by attaching callbacks to the promise object instead of passing callbacks in a function.
We use request.then to add code if the promise is succesful.
Otherwise, we use request.catch to add code if the promise has failed.
The magic about promises is that we do not need to nest them, we can instead return the next request and go from there and we only need to write one error handling piece of code.
Below is an example of
Creating our own promises
                    // Making a promise

                    const fakeRequest = (url) => {

                    return new Promise((resolve, reject) => {

                    const rand = Math.random(); // Promise conditions go
                    here

                    setTimeout(() => {

                    if (rand < 0.7) { // Promise needs if/else for resolve / reject

                    resolve('FAKE DATA HERE');

                    }

                    reject('REQUEST ERROR!');

                    }, 1000)

                    })

                    }


                    // Calling the promise

                    fakeRequest('/dogs/1')

                    .then((data) => {

                    console.log('DONE WITH REQUEST!')

                    console.log('data is:', data)

                    })

                    .catch((err) => {

                    console.log('OH NO!', err)

                    })
The Async Keyword
Async functions is a new feature of JS that helps us write clean asynchronous code. A syntax makeup for promises
2 keyword here;
- Async
- Await
- The Async Function always returns a promise
- If the function returns a value, the promise will be resolved with that value
- If the function throws an exception, the promise will be rejected.
When writing promises, we should always use the async function
                    // below we are creating a promise throwing errors if their is missing info or p/w is wrong

                    const login = async (username, password) => {

                    if (!username || !password) throw 'Missing Credentials'

                    if (password === 'aiidnd123!') return 'WELCOME!'

                    throw 'Invalid Password'

                    }


                    // Below we are calling the promise and returning the correct status messages

                    login('odondjdand',
                        'aiidnd123')

                    .then(msg => {

                    console.log('LOGGED IN!')

                    console.log(msg)

                    })

                    .catch(err => {

                    console.log('ERROR!')

                    console.log(err)

                    })
The Await Keyword
Await will pause the execution of the async function waiting for the promise to be resolved.
                    // Below the await keyword waits for the promise before to resolve before running, so all do not run at once.

                    async function rainbow() {

                    await delayedColorChange('red', 1000)

                    await delayedColorChange('orange', 1000)

                    await delayedColorChange('yellow', 1000)

                    await delayedColorChange('green', 1000)

                    await delayedColorChange('blue', 1000)

                    await delayedColorChange('indigo', 1000)

                    await delayedColorChange('violet', 1000)

                    return 'ALL DONE!'

                    }
Handling erros in Async Functions
Errors will stop code from running, so to handle errors and to display error messages to the user, we need to use the try/catch method
Ajax & API's
Ajax;
- Asynchronous
- Javascript
- And
- Xml
AJAX is used to send and recieve data from a server without reloading a webpage.
API;
- Application
- Programming
- Interface
APIs is what is used to fetch or send data to the server. Like a waiter in a restuarant connecting the chef to the customer, APIs connect the server to the user.
Companies can create APIs with endpoints we can connect to those endpoints to consumer/integrate the data from the API
JSON;
- Java
- Script
- Object
- Notation
JSON is JS based code that uses key value pairs to display data.
Use JSON.parse method to parse JSON into a JS object
                     const data = {JSON GOES HERE}


                     // Save JSON into a variable

                    const parsedData = JSON.parse(data);
We can also turn a JS object into JSON using the JSON.stringify method which is useful if we want to send data to an API.
Headers
With HTTP requests, we have the body, headers and status codes
Headers are a bunch of key value pairs which acts as the metadata for the HTTP response.
Query Strings
Alot of APIs require us to use query strings which look like URLsearch?q=react
Fetch API
The newer way of making requests via javascript
When the Fetch API runs, it resolves the promise once it recieves the first headers from the API, the data may take a while to fetch, so when the .then code runs, we may not have all the data yet, so we need to use a method called .json which returns a promise.
In a fetch call we need to fetch the data in the response, then parse the data in JSON using the 2 .then methods
                    fetch('API GOES HERE');

                    .then(res => {

                    console.log('RESPONSE, WAITING TO PARSE', res)

                    return res.json() // This waits for all the data to come before returning.

                    })

                    .then(data => {

                    console.log('DATA PARSED...', data)

                    console.log(data.ticker.price)
 // fetching data from the API
                    })

                    .catch(e => {

                    console.log('OH NO! ERROR!, e)

                    })


                    // Making above with async and await

                    const fetchBitcoinPrice = async () => {

                    try {

                    const res = await fetch('API GOES HERE');

                    const data = await res.json();

                    console.log(data.ticker.price);

                    } catch(e) {

                    console.log('SOMETHING WENT WRONG!', e);

                    }

                    }
Intro to Axios
Axios is a library for making HTTP requests which is built on top of fetch.
To include Axios in our projects
- Go to the Axios github repo here.
- Copy the jsdelivr CDN link.
- Copy the script into the HTML before the app.js script, usually in the head.
With Axios we do not need to await for the data to be fetched and then parse the JSON, Axios handles that for us.
Below code does the same as the code in the Fetch API section
                    // creating our Axios API call

                    axios.get('API GOES HERE')

                    .then( res => {

                    console.log(res.data.ticker.price)

                    })

                    .catch(err => {

                    console.log('ERROR!', err)

                    })


                    // Putting the API into an async function

                    const fetchBitcoinPrice = async () => {

                    try {

                    const res = await axios.get('API GOES HERE')

                    console.log(res.data.ticker.price)

                    } catch (e) {

                    console.log('ERROR!', e)

                    }

                    }
Setting headers with Axios
                    // creating an API call that changes the header to get back the data in json

                    const getDadJoke = async () => {

                    const config = {headers: {Accept: 'application/json'} }

                    const res = await axios.get('API GOES HERE', config)

                    console.log(res.data.joke)

                    }