Terminal documentation
Basic terminology
- Terminal A text based interface to our computer.
- Shell The program running on the terminal.
- Bash One of the most popular shells.
- Z Shell The new default shell on a mac.
The following are commands for the terminal;
- cd change directory (access different folders on the computer)
- cd.. move back to the previous folder.
- pwd Shows the path directory of current position (print working directory).
- repository the folder where the project is kept.
- la show hidden folders.
- ls show contents of the folder(stands for list).
- ~ Goes to the home directory (option+up arrow)
- / Goes to the root directory
- mkdir (folder name) Creates a new folder.
- touch (file name) (file name) (file name) Creates one or multiple files.
- cp (file name) (folder name) Copies a file to a specific folder.
- mv (file name) (folder name) Moves a file to a specific folder.
- rm (file name) Deletes a file.
- rm ‐rf (folder name) Deletes a folder.
- open (file name) Opens a file.
- sudo Use this in front of any commands if I run into permission errors. Sudo will allow me to type my password to continue.
- man (command) Shows a manual about the command entered
- FlagsFlags are methods for commands found in manual that allows us to change the behaviour of that method, for example, listing folders by size instead of alpabetical order.
Node.js
Node.js
Node.js is a javascript runtime that executes javascript code outside of the browser. Node.js allows us to use javascript for the backend instead of relying on python or ruby. Node.js allows developers to write and run javascript applications on the server. Developers started using Node.js to also write tools to help them with local web development.
Using Node, we can create;
- Web servers
- Command line tools
- Native Apps
- Video games
- Drone apps
- And much more!
Installing Node.js
Go to nodejs.org to install Node.js. Only needs to be installed once per computer.
The Node REPL
REPL stands for Read Evaluate Print Loop. Once you type node in the terminal, we will be in the Node REPL where we can debug and type js. This works like the console in the web browser.
How to run Node files
Instead of running js files in a browser, we can run Node files by;
- Going to the directory in the terminal
- Type node {files name}
- We can run files from a different directory by referencing the full file path
Process & argv
Process is an object in the global scope, that provides information, and control over, the current Node.js process.
process.argv returns an array containing the command line arguments passed when the Node.js process was launched.
- The first element will be the execution path
- The second element will be the file path to the javascript file being executed.
- Any remaining elements will be additional command line arguments. We can pass arguments to a script in the terminal like you would to a function in js. These arguments will be added to the argv array.
Node modules
Instead of adding js scripts in html to require the js file, in Node, you can write modules to require. Lots of frameworks such as express are just node modules other people have written in js.
To require a Node module;
- Set module.exports in the js file we use the module.
- const {name} = require('./{file name}');
Module exports
For js files we want to use as Node modules, we need to write what we want to export.
To export specific functions;
- module.exports.{function name} = {function name};
- We could add module.exports directly to the variables we call such as module.exports.{function name} = {function};
Alternatively, we can add the exports into an object;
                    const math = {

                    add: add,

                    PI: PI,

                    square: square

                    }


                    module.exports = math;
Requiring entire directories
To require entire directories;
- Make sure all files have the right module.exports
- Make a file in the directory called index.js
- Within index.js, require all the files in the directory
- Within index.js, add all the require variables into an array.
- Within index.js, Add the array variable to module.exports
- Then require the entire directory, node will look for the index.js file
NPM
What is NPM?
NPM is a Node.js ecosystem where we can find lots of modern frameworks and libraries to help us build our projects.
NPM
NPM is a simple command line interface that allows developers to install and manage packages on their local computers. There are all kinds of open source tools, libraries and frameworks needed for modern development. Modern web development could simply not exist without a package manager. NPM also allows us to create automations of repetitive tasks.
Installing NPM packages
- Make a folder for the NPM package.
- In the terminal, type npm install {package name}
Using NPM packages
- In the JS file, we need to require the npm package
- Read NPM package docs on the right functions to use.
const jokes = require("give-me-a-joke");
Linking global NPM packages
Most NPM packages are installed locally and can only be used within the folder it is installed, but to install an NPM package globally, use the -g tag, and then do the following to link;
- In the terminal, navigate to the right folder
- Type npm link {NPM package}
Create a package.json file
package.json file creates the definitions of our project and writes the NPM packages here that we will use
In the terminal, in the project folder;
- npm init OR npm init -y
- Type project name
- Select version
- Write a description of the project
- Fill out author name
- All the other fields are okay to leave blank
After this, the package.json file will be created in the project folder with all the project information.
Installing all dependencies for a project
To install all the dependancies for a project;
- Go to the correct folder in the terminal which has the package.json file
- Type npm install
Installing Sass
In the terminal, in the project folder;
- npm install node‐sass ‐‐save‐dev
‐‐save‐dev allows us to save this as a dev dependency.
‐‐save allows us to save as a dependency.
Use dev dependencies for packages like Sass, that are actual development tools to help us code and build our project. For other things such as js frameworks, just save them as a dependency.
List of dependencies in the package.json file is needed for when we share our projects, instead of sending all of the modules/packages with large files to other developers, we just share the code we wrote with the package.json file, then the other developer can type in the terminal npm install to install all of the dependancies to run the project locally on their computer.
To uninstall packages
npm uninstall jquery ‐‐save
Compile Sass
- In the package.json file, write the following script "watch:sass": "node‐sass (input file) (output file)" ‐w
- input file is the file of our main Sass
- output file is the file of where the compiled css will go
- ‐w will watch for changes so we do not have to keep compiling our code manually. We need to keep the terminal open to keep saving the changes automatically.
- In the terminal, run the script by writing npm run watch:sass
                    "scripts": {

                    "watch:sass": "node-sass
                        sass/main.scss css/style.css -w"

                    },
Installing live server
In the terminal;
- npm install live-server ‐g
- In project folder, write live-server to run the live server
‐g is when I want to install something globally on my computer for all projects.
Build processes with npm
What is a build process?
A build process is a sequence of tasks we do automatically after we have finished a product or a feature of a product. The result of a build process is one or more final files that are ready for production.
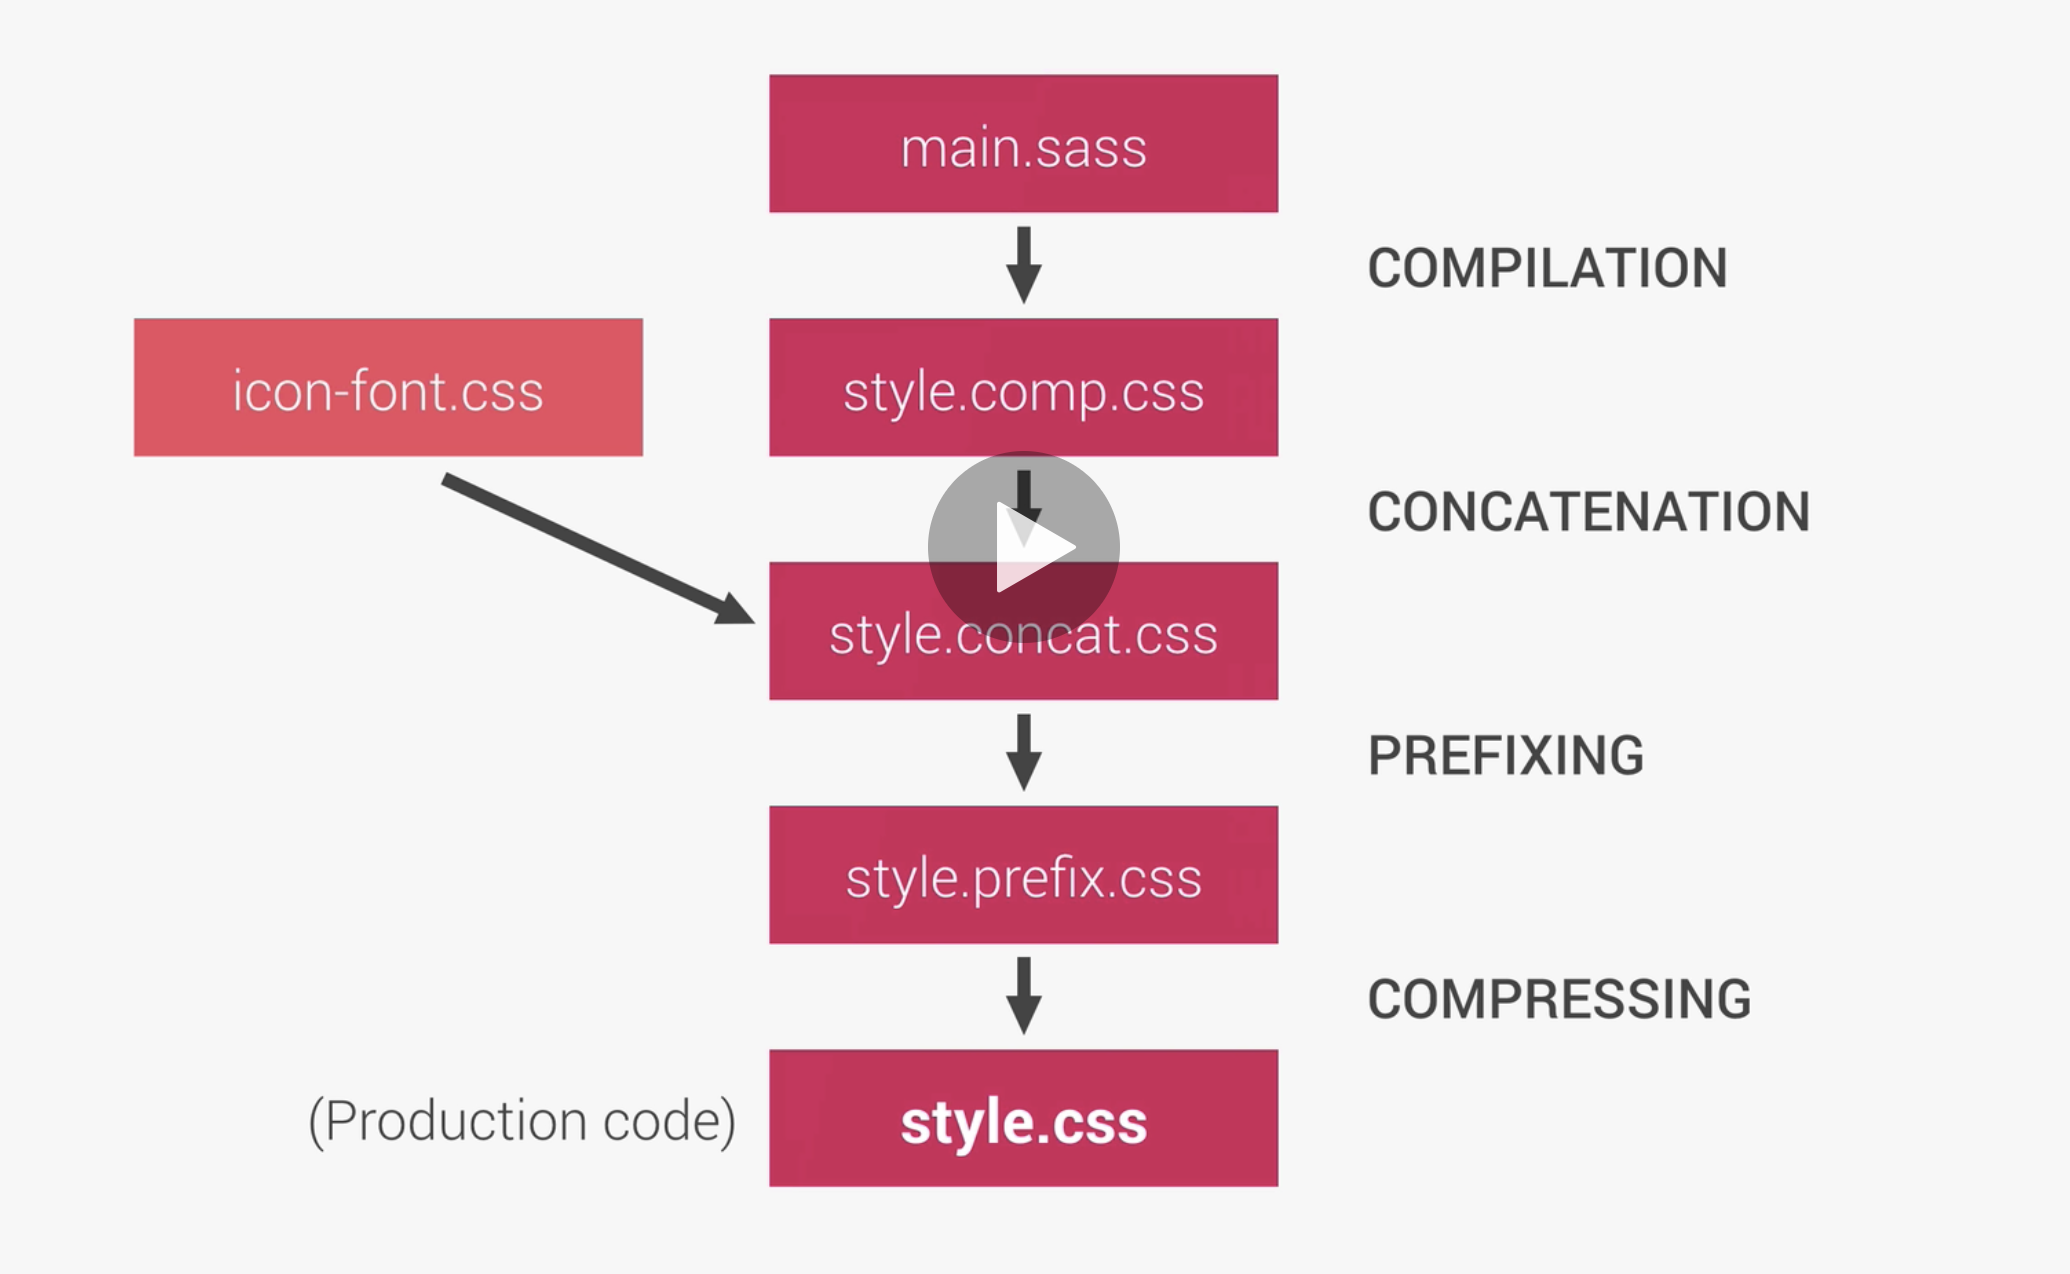
The image above shows the following build process;
- Compile our main.scss file to our style.css file
- Then we merge the style.css file with the css from the icon font file or other css files so we push only 1 css file to production.(concatenating files)
- Then we want to automatically add prefixes to our code.
- Finally, compress the entire code to our production css file.
How to create a development build process
- Create dev server using the live server.
- Create a start script that uses --parallel to run the scripts at the same time.
- Then in terminal, put npm run start
                    "scripts": {

                    "watch:sass": "node-sass sass/main.scss css/style.css -w",

                    "devserver": "live-server",

                    "start": "npm-run-all
                        --parallel devserver watch:sass"

                    },
How do we make a deployment build process
- In the package.json file, add a compile:sass script to compile all of the sass code to style.comp.css and make sure we do not watch the compile.
- In the terminal, install the concat npm package by writing npm install concat --save-dev
- After installing the concat npm package, in the package.json file, add the concat script concat -o (output file) (css files to concatonate)
- -o stands for output file.
- This concatonates all css files listed into a new file which we set as the output file.
- In the terminal, run the concat script npm run concat:css
- For the auto prefixing, install the npm prefix package, in terminal, write npm install autoprefixer --save-dev
- Then install postcss npm package, in terminal, write npm install postcss postcss-cli --save-dev
- In the package.json file, add the script "prefix:css": "postcss --use autoprefixer -o (output file) (input file) "
- The autoprefixer adds prefixes to css rules that need them for browser support such as -webkit- or -moz- etc
- In terminal, npm run prefix:css
- To compress the files, in the package.json file, write the script "compress:css": "node-sass (input file) (output file) --output-style compressed"
- --output-style compressed compresses the final css code
- Install new npm package, npm install npm-run-all --save-dev
- Finally, we need to write a script that will do this whole process at the same time, write script "build:css": "npm-run-all compile:sass concat:css prefix:css compress:css"
- Then run the build:css script.
                    "scripts": {

                    "watch:sass": "node-sass sass/main.scss css/style.css -w",

                    "devserver": "live-server",

                    "start": "npm-run-all
                        --parallel devserver watch:sass",


                    "compile:sass": "node-sass sass/main.scss css/style.comp.css",

                    "concat:css": "concat -o css/style.concat.css css/icon-font.css
                        css/style.comp.css",

                    "prefix:css": "postcss --use autoprefixer -o css/style.prefix.css
                        css/style.concat.css",

                    "compress:css": "node-sass css/style.prefix.css css/style.css --output-style
                        compressed",

                    "build:css": "npm-run-all compile:sass concat:css prefix:css compress:css"


                    },
List of sources
- Colt Steeles web
developer bootcamp 2021
- Intro to Github